As much fun as a small device is on the road once it is setup, you need to get it to that point. With or without keyboard may not matter once you are on the go, but you need to get your device to that point.
Using the example of the OQO + Windows Live Mesh we will use the slightly hidden but very useful Live Mesh Remote Desktop to achieve our goal. (This procedure of course can be used for other devices running Windows as well using any remote desktop application which works for you.)
Why use a remote Desktop?
Syncing files is just one part of the equation and even if your MID has a nice keyboard, it is no comparison to your big keyboard, mouse and monitor when you want to setup all your tools and applications. And before that, you want to familiarize yourself with all the bells and whistles the little device might have. This is much easier achieved when you are not distracted by a different input device.
You can make a regular routine out of how to use the device in combination with your main computer. Usually when I travel, I have a special folder containing all the files I need and also save all files I need back on a special folder on my mobile device. This way I am crystal clear what needs to be synced or not. Using it with Live Mesh has the additional benefit that you should be able to sync files against the cloud and just switch on your MID before you go onto tour.
Step 1: Take care of your battery
One of the more expensive and fragile parts of your MID is the battery. Call me superstitious, but I like like to remove the battery so I do not have to worry about any kind of strain on the battery. Plus you do not need to worry about running out of battery if you leave the device on for some hours during syncing / installing.
Unplug the battery, connect to power and boot the OQO (Additional settings should be done once you are connected with the big computer).
Step 2: Install Windows Live Mesh on all machines
In order to use the device syncing and remote desktop capability of Live Mesh you need a Windows Live ID and the software. Head over to mesh.com and take a look at the feature list or more detailed information. While the main purpose is to have a ‘place in the cloud’ for your data or access your home computer through the web, we will use it ‘just’ for setting up our tools.
- get a Windows Live ID if you don’t have one yet
- download the Live Mesh Software
- install it on both machines, your main computer and the MID device
- start the software on each and add your device to the mesh
A more detailed instruction with pictures can be found here.
You can now try and sync folders and more, but we will work with the Remote Desktop. If you already have folders in your mesh, it will add these to the desktop without syncing them but with a remote desktop it is easy to clean up.
Step 3: Connecting the devices
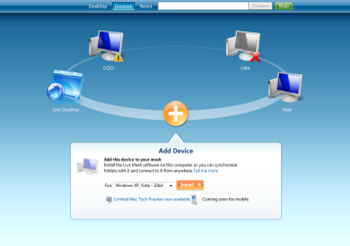
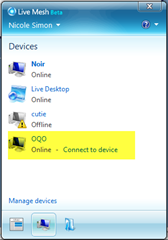
As soon as both devices are online and are connected through a Wifi (make sure it is not a connection through your Sim card unless you have a flat rate) you will be able to see the ‘Connect to this device’ in your main computer. In the picture below you can see that I have several computers in my cloud Noir is my big computer, Cutie my laptop (currently offline) and Live Desktop is your desktop in the cloud. By default you get 5 GB of storage on that Live Desktop, more than enough for most.
After clicking "Connect to device" it may take some time until your MID shows a popup window asking you to accept the remote access. Once you have agreed, you now have access to your little device through your big computer!
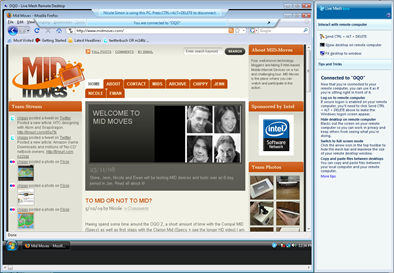
This is how the screen looks like (click on it for a larger image):
Step 4: Switch on the power
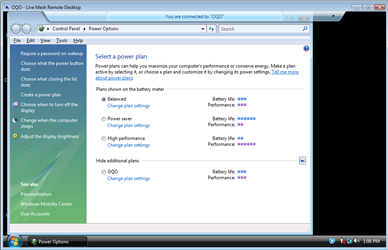
Now that your devices are connected and you are on normal power, you should change the power plan (right click on the power symbol, Power options).
I switched to "high performance" but remember to switch back.
Step 5: Setup and Install
You can now work with the device to run
- anything requiring installation / download because it is much easier to configure this through the remote desktop on the device
- anything needing login / passwords you can fill your browser / apps with all the relevant ones, like for example twitter / Flickr / Friendfeed
- setup complicated bookmarks like for twitter search or others which would be hard to type on the keyboard
- setup tools like Google Gears for Gmail and sync them while connected to real power and possible strong Wifi
Step 6: Disconnecting
Disconnecting the systems is very easy, you just click CTRL-ALT-Delete or press the according menu point on the Live Mesh Screen. If you are done for the day with installing and setting everything up, remember to switch the battery settings back and shut down the little device from the big desktop. Voila.
Problems I ran into
- Size of the desktop: As Live Mesh insists to have a special side bar, I was not able to have a screen in full resolution without scrolling or a slightly ugly font. Also the bar "You are now connected to OQO" was located at a least useful place on the screen, if I would run Firefox in full screen mode it would be exactly on the tab bar.
- you need to remember to switch back the power plan once you are back on normal battery. In my opinion it should automatically switch to high performance when it detects the power cord connection.
- the keyboard layout still is in English while I am typing on a German keyboard. This is relevant more for the special characters like :.?@ etc which are on a different keyboard than I am used to, but rather than switching over to a German setting, if I had something I was not able to type right away, I used copy and paste which works seamlessly between the desktops
- Usually, everything is synced through the cloud. But according to the Live Mesh team you can setup some fold
ers to only be directly connected without the cloud which would be helpful for files which are large or should not go into the cloud. Problem I found was that this does not work, at least not on my side. But in theory it should.
Overall it is an easy and simple way to connect the two devices out of the box with one another and setup everything I need and want to use.





well well
some times ago, i successfully registered my Fujitsu U1010 to Live Mesh.
but unhopefully my HP iPaq windows mobile phone cannot (yet) be registered…………
so until MS adds windows mobile to live mesh i ‘m unable to fully test it……..
come on MS !!!
Hmm funny, I was told that WIndows Mobile works in the newer versions – which one are you running on?
i have just downloaded the latest one and it fails registering my phone:
setup failed
this mobile phone was not added to your mesh
……
any help?
Great post, lots of info. Thanks.
I have about 5 devices on my Mesh and use the remote desktop function where a static IP is not available. I do find it slow, but that is more to do with my low bandwidth.
The side bar is removed when you go full screen and if you change the resolution you shouldn’t have to scroll.
I’m going to look into the MID devices. Thanks.
@mackney
I really like the mid concept,, and particularly your idea of mids and mesh, I will delve in further before asking some questions. I am running Mesh on a Fijitsu lifebook A6030 Core2duo T7300 with 3 mb ram lifebook, a Emachine Desktop Core Duo Pentium D 805 , 2mb ram .
Fuji runs win7 Beta 64
E-Machine runs win 7 Beta 32 (and roars like a dying dump truck…a real dog..Save your money.)
Mesh also now runs on my T-Mobile Dash, an older smartphone, that runs Windows Mobile 6.1.. Now that it is all working,, It really is a neat piece of code. Now, if I could just mesh my DirecTV DVR, Xbox and Zune. I’d like to further torture the E-machine and load Win home Server as a virtual machine…Sorry to get bit sidetracked, but I rarely find others running Mesh.. It’s really quite stable (on my motley” suystems anyway/
New article: Use Windows Live Mesh to setup and customize your MID http://bit.ly/ar3CdL