 Yesterday, I completed the final part of a series of upgrades that have been done to my Q1 Ultra to bring it up to what is close to my ideal all-round ultra mobile PC device. In this article I’ll outline what I’ve done and give you some detail about my most recent upgrade, swapping the 60GB hard drive out for an 8GB flash drive. The difference is quite remarkable. Not only do test results show up to 4x the read speed and 2x write speed but boot-times are quicker and the overall responsiveness of the system is improved dramatically. If you need convincing that SSD’s are fast before you take the jump, check out the video at the end of the (long and media-rich) post. Note that much of this applies to other devices that use 1.8" drives. The Sony UX, Fujitsu U810, HTC Shift and others.
The Q1 Ultra I have was originally a Q1 UV from the UK. I bought it second-hand and it came pre-loaded with a 2GB memory stick and the extended battery. When I look back at the posts I made at the time I can find nothing about the Q1 Ultra except an intro post. Blame Vista! Out of the box it was a real clunker of a device. Not only was Vista slowing it down but the Wifi drivers were proving to be a CPU drain too. An Early attempt at an XP install failed due to lack of drivers and so I left it on the shelf for quite a few months while I enjoyed the efficiency, portability and built-in 3G of the Raon Digital Everun. It wasn’t until I came back from CeBIT in March that I revisited the Q1 Ultra. I had enjoyed hands-on with the Q1 U premium XP at CeBIT and I was amazed at the speed and usability. The Everun had also shown its limits at CeBIT and so I decided to give the Q1 Ultra a go with XP. This post details the initial upgrade to XP and the first of my own mods, the HSDPA module installation.
Boot time was quick. The disk light wasn’t flashing like a Vegas slot machine. The battery life figures were looking a lot better and the grab-n-drag plugin for Firefox was working far better than it did on the Everun. After a week of using it around the house and enjoying the SD card slot, a lot more storage than the Everun, the wonderful screen and some quite impressive battery life with the extended battery, I decided to bite the bullet and drop an HSDPA module in. I took the module from the Everun (including the antenna that was shipped as part of the kit from Mobilx) and after re-soldering the connector (I broke it as I took it out of the Everun) it worked. It hasn’t got the reception quality I was getting from the HTC Shift (the current king of 3G reception in my opinion) but it’s working well; probably as well as on the Everun, and my bus test this morning was very successful.
After 60-days of using a trial XPTE without activation it was then decision time. Should I sell the Q1 Ultra and wait for a MID or perhaps upgrade to the Q1 Ultra Premium? At that time, one of the forum members, Elmstrom, reported about a successful CF card mod on his Q1U-EL and then, in the same week, news about the Transcend 300x UDMA CF card with ECC broke. A quick glance at my local price comparison engine made my mind up that an 8GB Flash upgrade would be the way to go.
So far, its been a great success. I’m seeing a huge improvement in response times and boot times. There’s a small drop in overall battery consumption and the device is obviously more rugged. As for heat and noise, I don’t think the HDD ever contributed much so there’s no noticeable difference there. The cost was about 100 Euro although I didn’t take much care to find the cheapest components. I suspect that the full 8GB kit could be bought for 80 Euros in total and as prices drop, it will tend towards 50 Euro making it a worthwhile upgrade. On the downside, i’ve lost a lot of storage. 50% of the disk is lost with the first install and another 1GB is lost through updates leaving just under 3GB to play with. With an optimised install using Nlite and a clear-up I think this can be improved to 4GB free space but if you are planning to carry large numbers of files, you will need to think about a large capacity SD card, external or online storage.
The How-To
The card I chose is the 8GB model number TS8GCF300 [detailed datasheet PDF] which has a theoretical transfer speed of 45 MB/s and implements UDMA Mode 5. In addition it has two features that are important when choosing a drive for an operating system. ECC and Wear levelling. [Note: The data sheet says that the card ‘supports’ wear levelling. It’s not 100% clear is this means ‘implements wear leveling’ but that’s something that i’ll have to report on in a few months time! An alternative is the 266x version of this card. Elmstrom, of the UMPCPortal forums, has reported similar results.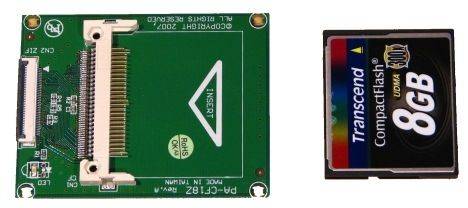
Putting a CF card into a device requires an adaptor. The adaptor type depends on your device but in this case I needed a 1.8" Toshiba ZIF to CF adaptor and it needed to support primary drive. Some adaptors, for example the one that comes with a Raon Digital Everun S6S, are locked to secondary drive mode meaning the Q1 Ultra BIOS, which only knows about one drive bay, will never see the device. The adaptor I chose was the one advised by Elmstrom and it’s the PA-CF18Z made by Ably-Tech and available at LinITX.com. It also appears on Ebay.
Preparation.
- Backup your HDD
- External USB CDROM
- USB Keyboard
- XP disks.
- Small cross-head screwdriver
- About 2 hours
Before you start the project, make sure you backup your hard drive if you have any important data on it. Make sure you have an external USB CDROM drive and USB keyboard. XP Home is a light and fast-booting option if you don’t need the handwriting recognition (touch screen still works) but I’ve used XP Tablet Edition.
Opening and removing the HDD drive.
Before you remove the drive, go into the BIOS and set it to boot from a USB-CDROM as the primary drive and HDD-1 as the secondary drive.
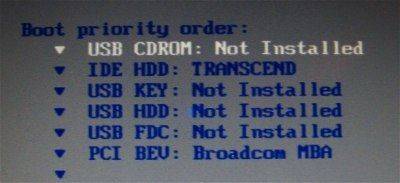
Boot priority set in the BIOS. (Images shows post upgrade. No CDROM attached.)
Turn off the device and remove power, SIM card and stylus.
Be aware that the next step invalidates your warranty!
To open the casing, remove the battery, sim card, stylus and power cable and undo the 5 screws in the battery bay. In addition, undo the two screws on the corners of the device nearest to the DC-in and VGA ports. 7 screws in total.
Lever the device apart by running a fingernail along the bottom of the device at the seam and twisting at the same time. Don’t use anything sharp or metalic as their are components just mm away! You will hear the case click apart at various points along the seam. Do the same on the battery side of the device and then on the left and top. The left and top part of the devices require some additional leverage but eventually you will be able to lift the case from the bottom and unlatch it from the mic opening. Its not easy as you can see in the video below but I’ve done it at least ten times now and nothing has broken so the casing seems nice and rugged.
Once you’ve undone the case, locate the hard drive, centre. Unfold it and wiggle/pull the ZIF cable out of the connector. The HDD doesn’t have a flip-up cable release latch like other zif connectors so you’ll have to wiggle it until it comes out.
The video below shows an early attempt to insert a CF card and the Raon Digital CF adaptor. While this setup didn’t work due to the secondary drive problem mentioned above, the principle is the same for all IDE adaptors. You’ll also see that I forgot to lift the latch on the ZIF connector and forced the cable in. This isn’t recommended!
These images show my current CF card adaptor and CF card. Click to enlarge.
Note again that the IDE adaptor I used has a ZIF latch on it. Don’t try and wiggle the cable in. Undo the latch, slide the cable in and then push the latch down again. The ZIF cable length requires that you fold the IDE adaptor under the cable. Above the IDE connector on the motherboard you’ll see that I have a module installed. If you don’t have a 3G module installed, your Q1 Ultra will have a blank space there.
Put the device back together by snapping the casing together and screwing-in the 7 screws being careful to make sure the device is tightly snapped together all the way round. At this point you should be able to replace the battery and power, connect the CDROM (I find the top port to be best for some reason) and keyboard and install XP just as you would on a new new drive. Make sure you make a fresh install on a new partition that is formatted to NTFS. (For a Windows XP install)
After the install you’ll need to download and unpack all the required drivers and software from the Samsung support website. I’ve been using the download center for the Q1 U CMXP.
Driver and software tips
Install the Atheros driver first. I had a number of problems with the Atheros driver and had to re-install XP twice before I got it working. Installing the driver first seems to be the key to success here.
If you install XP TE SP2, the touchscreen should be picked up and supported under native Microsoft HID drivers. I prefer these drivers to the Samsung drivers which require additional software and don’t support floating TIP or other tablet features.
All other drivers can be installed as required, in any order.
The battery manager, network manager, menu and easy button manager are all recommended software installs as they enable the buttons and help with battery life. The network manager is extremely important if you have an HSDPA module as it appears to turn make the device far more battery efficient. I guess it’s turning radio’s off when not in use.
Nlite builds
I tried a few different installs of XP. The first attempt was with a Nlite version of XP TE. Unfortunately, the touchscreen drivers didn’t install (not a problem if you use the Samsung Touchscreen drivers from their driver site) but the biggest problem is that the Realtek SRS drivers wouldn’t install as they seem to cross-check for some other software. The install of the sound drivers aborted and I could not get sound to work. There may be a work-around for this with basic sound drivers from another source.
My basic Nlite build shaved a good 15-20 seconds from the boot time and save around 200MB of disk space and some memory footprint (estimated about 50MB of base memory footprint.)
You need to work out if the trade-off is good for you. Nlite isn’t simple and can cause issues further down the line. Personally, I don’t have the time to run off 3 or 4 Nlite installs to get the right build so i’ve opted to stick with a full XPTE install.
Problems?
If the device doesn’t turn on, check that the battery is seated properly
If the device doesn’t see the CDROM, try using the CDROM in the other USB port. Also, fully power off both CDROM and device and re-start. Make sure you have the boot disks in the CDROM and remember to press a key when it says ‘press any key to boot from CDROM.’ !!!
Slow CF card. If the CF card appears to be slow (copying the XP installation files shouldn’t take more than about 5 minutes) make sure that 1) THE CF card supports UDMA mode. 2) The BIOS is set to autodetect the hard drive.
After the install you’ll need to download and unpack all the required drivers and software from the Samsung support website. I’ve been using the download center for the Q1 U CMXP.
I’ll add hints and tips to this section as queries come up.
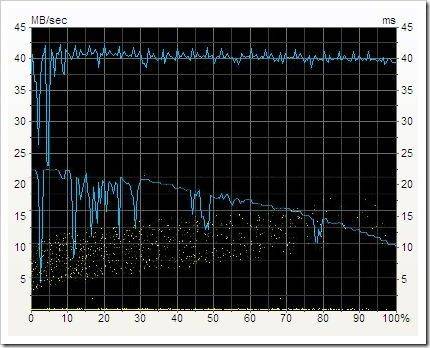
Read speed Test results
The image above shows the clear advantages of the CF card in read speed. The composite image shows the HDD starting at around 21MB/s and dropping down to 10MB/s where the CF card achieves a constant 40MB/s read speed across the memory range. Access times dropped from an average of 18ms to 0.3ms which is a huge advantage.
Write speed and other benchmarks
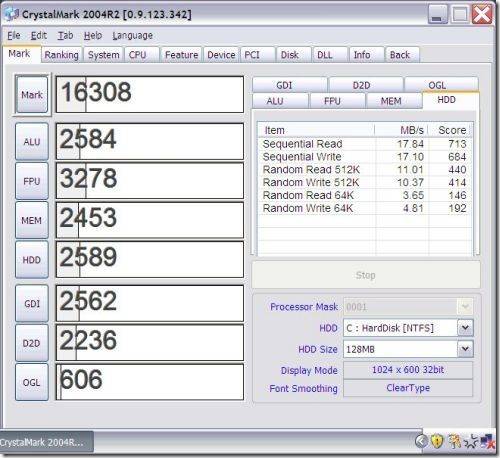
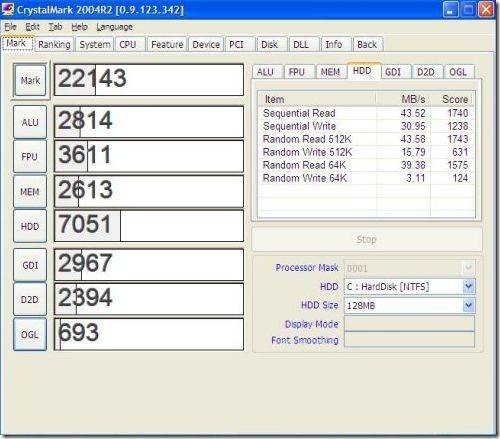
The two images show the results from CrystalMark on the HDD-based system and the SSD-based system. Both were fresh and clean installs of XP on a system running in high-performance mode on mains power. The first shows the HDD results…
The second, below, shows the results with the SSD…
Sequential write speeds are doubled and the overall HDD score is something closer to what you’d see on a desktop rather than a UMPC. Note that all the other results have improved by about 10% indicating that background HDD accesses were taking up valuable bus bandwidth or CPU clock cycles. This is an unexpected bonus and contributes to the impressive CrystalMark score of over 22000. For comparison, the Raon Digital Everun I was using before, turned in a score of about 11000.
Boot times.
The video below shows a side-by-side boot-time comparison. You’ll see that the CF-based device isn’t any quicker to get to the log-in screen but it’s way ahead in terms of being able to use the device. On the Nlite build that I tested, it was booting and accessing igoogle within 37 seconds. That’s very quick!
Battery Life.
I’ve tried hard to get some real test figures from the Q1 Ultra in HDD and CF build but it’s almost impossible. The only thing I can report is that I’ve managed to idle the CF-based device down to 4.5W with the backlight on which is as low as I’ve ever seen a Q1 Ultra go. I can not reproduce that with the HDD installed. In theory, the CF card should return about 10-15 minutes extra battery life over the HDD.
Heat.
There are heat advantages but its not dramatically different. If I run the Q1 with an HDD for 30 minutes and take it apart I can feel a lot of heat on the HDD which you dont get on the CF card but in normal use you probably wouldn’t notice it.
Other test results.
- Return from hibernate (2GB RAM): 29 seconds
- Standby to iGoogle: 16 seconds
- FF3.0 start to iGoogle: 3.5 seconds
Long term Testing.
Before you dive into a project like this, a word of caution. As I mentioned earlier in this article, it’s not 100% clear if the Transcend 300x CF card actually implements wear-levelling which puts a question-mark over it’s long-term stability. Of course, you’ll hear from me as soon as there are problems and in the meantime, i’m trying to get some feedback from Transcend on the issue. If flash longevity is of major importance, you need to be looking at industrial 1.8" flash drives where the cost is much higher. If you’re just tinkering, carry on!
And now, on to my favourite video….
The party piece.
This video is the one that sums it up for me…






Great stuff Steve, thanks for sorting out my Q1U can I have it back now please… ;)
I’ve still got about eight months on my warranty, so I’ll hold off on the mod. Any idea how well I’d do by installing one of these cards in a CF->PC Card adapter in my p1610’s PC Card slot?
I’ve been searching all morning for a site in the US (including ebay) for the Ably-Tech PA-CF18Z adapter without success.
Can someone PLEASE provide a US source for this or another adapter that will work?
Thanks in advance!!
Not sure if this would work or not, but worth investigating…
http://www.addonics.com/products/flash_memory_reader/adzifcf.asp
you can also explore the results of this google search
http://www.google.com/search?source=ig&hl=en&rlz=&=&q=zif+to+cf&btnG=Google+Search
Kevin Neel, the PCMCIA to CF adaptor is not accesible during the boot. That means that your Operating System can’t be installed in that card. You can’t even move the Swap file, temp folder, or readyboost into that card. And it’s a shame because I have tested in my P1610 and that unit is a lot faster than the 4800 RPM HDD in the P1610.
We have been doing these kinds of upgrades to Amtek T700 since long time ago
http://origamiproject.com/forums/post/27682.aspx
October 2007, to be exact. And I remember back there JKK telling me that that was not a good idea because of the short life of the CF cards.
Oh, BTW, so far we have not seen any CF card dying on us. ;)
Hi, very interesting post!!
Now, I have a question about Q1U’s wireless card.
Everybody knows the issue this card is affected by: the very low range. So, in the video and in the images I see that this card, like most laptop cards is detachable. So my question is: is it possible to change this card with another more functional one??
Thanks for answering.
Bye.
Another more question: my Q1U has a sim slot, but I think that my Q1U-000/sei has not a HSDPA module inside. but Is it possible that this slot is a disabled hsdpa module? is it possible to “enable” it? or is it possible to add a hsdpa module by inserting a specific part inside the q1u? thanks again
Just as an update, my Q1 Ultra with the SSD mod is still going strong. Its still early days though. Only a few months since I did the upgrade.
Steve.
Thanks for posting instructions. I’m thinking of installing Vista. Do you think CF with great capacity would work. Something 32GB CF Card. I would appreciate your response.
Regards,
Ahmed
Installed a transcend 32G CF but it seems pretty slow after install. It took over two hours to install Windows. The CF is UDMA 4 and the Samsung Q1 detects the Transcend. Any help?
The 32GB transcend card is only 133x, and the one used in this tutorial is 300x, So the only thing I can suggest is to buy a 16gb or 8gb 300x card because I don’t think transcend has released a 300x 32gb cf card. Or you can try a software raid with two 32gb cards in a dual adapter if it fits inside. I imagine a raid would be twice as fast.
hows the battery life? thanks!
and is the mod suitable for old Samsung Q1 too? thanks in advance.
Frampton used it on his album Frampton Comes Alive! ,
How-To: Improve the Q1 Ultra UMPC by Replacing the HDD with a CF … http://tinyurl.com/ygj5eve
I’ve never done a mod, I just got a netbook, and was looking to add a better 1.8 inch zif to speed it up – something like this http://bit.ly/5e7JWA – as I hear the Runcore run significantly faster. I’d like to get the most out of this thing, and drive size isn’t terribly important to me – speed is. Should I undertake (or perhaps better, have someone else undertake) this task for me?
Thanks.
-B
again… what are the specs and form factor for the HSDPA is this a standard card or have I to request a specific spec… also how bout 4g/wimax?
thank you for your time and consideration
Peace With You
I have installed Transcend 32G 400x card on my Q1U. The read speed is 55-57 MB, but the write is only 8-10 MB. Any help?