umpcportal home

Tag Archive | "case"

Galaxy Tab Keyboard Case


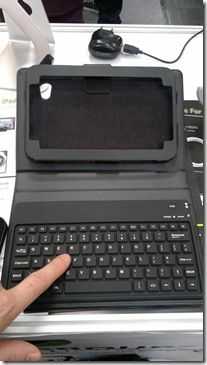
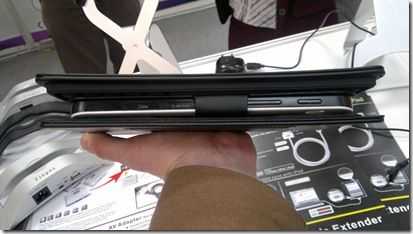
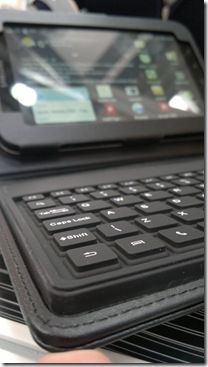
There are rows and rows of accessory manufacturers at every computing expo and much of it is the same stuff over and over again. This Bluetooth keyboard case for the Galaxy Tab stood out though.

Galaxy Tab Keyboard (6) Galaxy Tab Keyboard

Galaxy Tab Keyboard (2)

Galaxy Tab Keyboard (3).jpg Galaxy Tab Keyboard (4).jpg Galaxy Tab Keyboard (5).jpg

Galaxy Tab Keyboard (1).jpg

The keyboard was a rubber membrane design and in my short test I recon it was faster than thumb typing but you do need to concentrate hard. Still, it’s a nice little compact solution if you’re looking to assemble a smart-book-like device.

Rosen Groups, Shenzen, China are the people you need to contact if you fancy importing a box of these at $27.50 a piece. If you do, put me down for one please!

You’ll also find a few other images in the gallery and check out their website for more info and stay tuned because we might be popping back to check out their Galaxy Tab stands and chargers too

Keyboard / Case for Viewpad 10


image

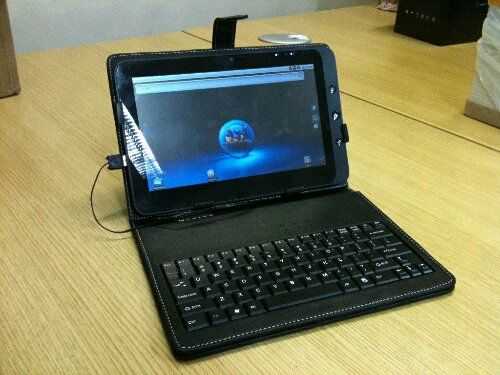
I’ve been sent this image of an interesting keyboard / case accessory that the Viewsonic people are an accessory manufacturer is working on and I guess feelings about this are going to be polarized. On one hand you’ll have the people that see it as a netbook and query the total price of the package. On the other you’ll have people interested in the modular and touch aspect of this setup.

Certainly a netbook would be cheaper but what about one that has touch, removable keyboard and auto-rotation and a case?

I hope this is a wired solution though. There’s nothing worse than running out of battery on a Bluetooth keyboard when you’re in the middle of something.

Apple: Free Cases to iPhone 4 Owners or Refund. I’m Not Satisfied, Considering Changing Phones After Owning the Last 3 iPhones


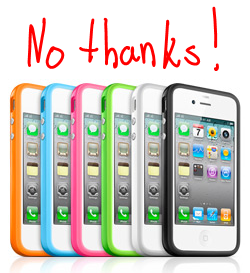
bumpers Apple’s press conference is still doing some Q&A as I write, but the gist of it consisted of Apple saying that all phones have the reception issue when held in certain ways and that they don’t actually have a problem that is unique to their device. Still, they say that they want to make customers happy and so they are offering a free case to iPhone users or accepting returns for full refunds through September 30th. Apple says they will present a few different cases for customers to choose from as they are unable to make their own first-party bumper cases quickly enough to keep up with demand. Apple also says that if you bought a bumper case, you’ll be refunded, however, third-party cases will not receive refunds. Customers can apply for free cases from Apple on their site, “late next week”.

I wrote yesterday about why a free case wasn’t going to cut it:

I personally won’t be satisfied with a free bumper. I want a new phone, and one that works. I’m a phone holster kind of guy, and naturally, a bumper on my phone wouldn’t slip in an out of holster very easily. I also don’t like the idea of buying a flawed product then requiring that an accessory be always present to fix it. I quite like the aesthetics of the iPhone 4, despite the fact that they are responsible for the reception issues. I don’t want to cover up the sides of the phone.

Hearing Apple say that they don’t think they have a problem when myself, and many others have been putting up with the issue, is very frustrating. This feels like a good opportunity to go for a new phone. I’ve been using the iPhone since the 3G, but I’d totally snag a Droid X [portal page] or HTC Evo 4G [portal page] if I could; the major roadblock for me is that neither of those phones are available on AT&T, and at the moment there really aren’t a lot of good options to choose from other than the iPhone on AT&T.

The only phone I’d likely consider is the upcoming Samsung Captivate which is due to be released on the 18th. Apple is offering a “full” refund on the iPhone 4, which for me would mean $299 back, but if AT&T doesn’t return my upgrade availability then I won’t be able to get a subsidized deal on a new phone, thus making returning the phone a huge waste of money. I just locked an offer in with Gazelle.com to sell the iPhone 4 for $493, just in case.

Let’s not forget that I had to agree to a new two-year AT&T contract to purchase the iPhone 4, and I’m doubting that AT&T will undo that if I return the phone. Apple was very unclear on this point in their press conference, but if AT&T doesn’t return “upgrade eligibility” to customers who return their phones, then you’d be better off selling your phone to recoup the costs than returning it to Apple.

Apple says they want to make every customer happy… I’m certainly not happy right now.

Apple: Free Cases to iPhone 4 Owners or Refund. I’m Not Satisfied, Considering Changing Phones After Owning the Last 3 iPhones


bumpers Apple’s press conference is still doing some Q&A as I write, but the gist of it consisted of Apple saying that all phones have the reception issue when held in certain ways and that they don’t actually have a problem that is unique to their device. Still, they say that they want to make customers happy and so they are offering a free case to iPhone users or accepting returns for full refunds through September 30th. Apple says they will present a few different cases for customers to choose from as they are unable to make their own first-party bumper cases quickly enough to keep up with demand. Apple also says that if you bought a bumper case, you’ll be refunded, however, third-party cases will not receive refunds. Customers can apply for free cases from Apple on their site, “late next week inch.

I wrote yesterday about why a free case wasn’t going to cut it:

I personally won’t be satisfied with a free bumper. I want a new phone, and one that works. I’m a phone holster kind of guy, and naturally, a bumper on my phone wouldn’t slip in an out of holster very easily. I also don’t like the idea of buying a flawed product then requiring that an accessory be always present to fix it. I quite like the aesthetics of the iPhone 4, despite the fact that they are responsible for the reception issues. I don’t want to cover up the sides of the phone.

Hearing Apple say that they don’t think they have a problem when myself, and many others have been putting up with the issue, is very frustrating. This feels like a good opportunity to go for a new phone. I’ve been using the iPhone since the 3G, but I’d totally snag a Droid X [portal page] or HTC Evo 4G [portal page] if I could; the major roadblock for me is that neither of those phones are available on AT&T, and at the moment there really aren’t a lot of good options to choose from other than the iPhone on AT&T.

The only phone I’d likely consider is the upcoming Samsung Captivate which is due to be released on the 18th. Apple is offering a “full inch refund on the iPhone 4, which for me would mean $299 back, but if AT&T doesn’t return my upgrade availability then I won’t be able to get a subsidized deal on a new phone, thus making returning the phone a huge waste of money. I just locked an offer in with Gazelle.com to sell the iPhone 4 for $493, just in case.

Let’s not forget that I had to agree to a new two-year AT&T contract to purchase the iPhone 4, and I’m doubting that AT&T will undo that if I return the phone. Apple was very unclear on this point in their press conference, but if AT&T doesn’t return “upgrade eligibility inch to customers who return their phones, then you’d be better off selling your phone to recoup the costs than returning it to Apple.

Apple says they want to make every customer happy… I’m certainly not happy right now.
How To: Simple Waterproof Bag for iPhone/iPad/iPod Touch, or any Capacitive Screen Device [Video]


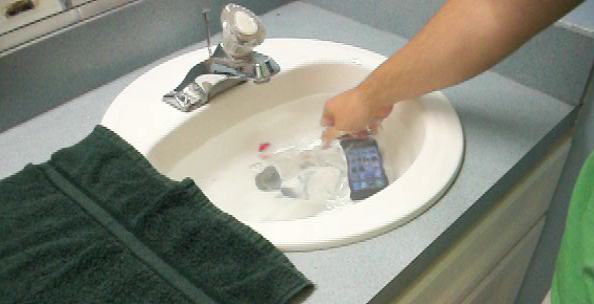
waterproof If you’ve ever wished you could check your RSS feeds in the shower or read an eBook in the bath without fear of dropping your device, this could be the super low-cost solution for you!

Use at your own risk!

Just pick up a box of watertight zipper bags and double bag your capacitive device inside. The screen works perfectly through the plastic and the bags will keep your device dry. I wouldn’t recommend sustained completely submerged browsing, but this simple solution works great in the shower, or as protection in case you were to drop your device in the bath or pool. Also make sure not to expose the device to temperatures too hot for an extended period of time.
I’ve always wished that I had waterproof speakers to listen to music in the shower, but apparently all I need is a waterproof iPhone. You could set speakers up in the bathroom, hooked up to a netbook or UMPC, then use the Remote app on your iDevice to control iTunes and remotely control the music. See the waterproof bag in action:

How to: Make an iPad Booksafe Case


IMG_4226 IMG_4225
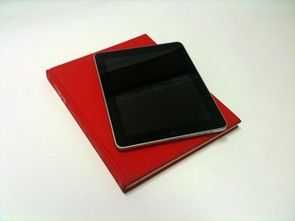
By now you’ve likely seen my ‘iBook’ project. As I mentioned, I documented the process and now I’m here to post the guide in case anyone else is interested in making their very own. There is definitely more than one way to make a book safe, and if you have more appropriate tools, feel free to improvise. The methods I selected we’re based on low cost and simplicity and will at least give you a good idea of the process. Let’s get started.

Project cost: aprox. $10

Project time: this project can be completed in a single day, but you’ll definitely want to set aside a large chunk of time for page cutting (might want to grab your headphones for some music!)

Required materials:

  • A fitting book
  • Precision knife (Xacto, packaging knife, etc.)
  • Rubber cement
  • Scotch tape
  • Pencil
  • Patience (quite a bit of it)

Tips for book selection:

Local bookstores are likely to have very inexpensive used books. The one I used was $2. I bought three books of varying sizes to be sure I got the fit I wanted. I used one book as a practice first before doing the final one (lots of cutting!). I took my iPad to the store to size up several books. Things you want to look for in the book depth, be sure that there are enough pages in the book that your iPad will fit all the way in. This is probably the toughest part of the selection process because it can be hard to judge. You may wish to measure how high your iPad stands off of a flat surface before going to the book store, then find a book with page width that is equally or slightly deeper than the measured value. Be sure that the book has enough padding around your iPad. That is, make sure that when you cut out the shape, the resulting thickness of the pages is enough to support your iPad and withstand a fairly intensive cutting process. You don’t want to try cut the shape out with, say, 0.2 inch of padding, you’ll likely rip some pages during the process. There is about 0.75 inch of padding in my final iBook.

Steps

  1. IMG_4204 IMG_4205
    Remove the cover of the book (if it has one) and center the iPad face-down inside the cover. Use the pencil to trace an outline, you should hold the pencil perpendicular to the paper so that the side of the pencil pushes against the side of the iPad as you trace. The distance from the side of the pencil/iPad to the tip leaves a good buffer in your outline and subsequent cut to ensure a good fit. If you cut it a little too big you can always add spacers to increase the tightness, but if you cut it too small, you’ll have a hard time figuring out how to recut all of the pages…. (Note that the volume rocker and hold switch will be on the opposite site when the iPad is face-up in the finished product, cutting around them specifically would be too tedious, this is what the buffer is for.)
  2. IMG_4207 IMG_4209 You want your first several cuts to follow the rounded shape of the iPad’s corners. I’d recommend cutting the rounded corners for 10-20 pages. After that you’ll be cutting square corners (much easier!), but the top pages will give it a round corner look, which will give a more custom-fit appearance. Use your knife to begin cutting on your outline. I pressed very firmly with my knife to cut through several pages at once, then pulled them out until I needed to cut again (early enough that I could still see previous cut marks and knew where to cut). Finding the right number of pages to cut through and pull out before making more cuts its probably the most challenging part of this project. Just make your cuts carefully and eventually you’ll get into a rhythm. Don’t forget to square your corners after the first 10 or 20 pages and continue to cut them that way. Square corners are much easier to cut than the rounded ones. I used a paper clip to keep part of the cut pages closest to the binding out of my way while I continued to cut. They don’t like to fold back with the rest of the page because most of their support has been cut out!
  3. IMG_4208 IMG_4211
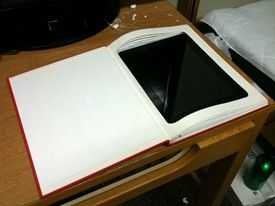
    While cutting, do occasional test fits to ensure that the cuts are coming out properly. If you aren’t through too many pages, put the iPad in face-down to get the best idea of how it will fit (the rounded back makes this deceiving when it is face-up and you don’t yet have a lot of depth.) Finding that you are having fitting problems would be much better in the first 30 pages then after 200 cuts! As long as you were careful with your outline (and added an appropriate buffer) and keep the cuts consistent, you shouldn’t have an issue. One thing to look out for. The more pages you cut and fold back, the further the subsequent pages will be pulled toward the binding (slowly misaligning the top cut from each one underneath). If you don’t correct for this, your page cuts will have a distinct diagonal shape on the left and right. You can adjust for this by slowly moving your cuts to the right to keep them in the same relative position as the first cut (be sure to do this on the left and right sides of the cut.)
  4. IMG_4210 IMG_4215
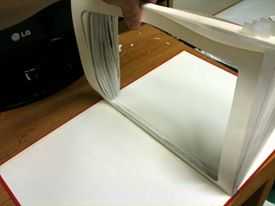
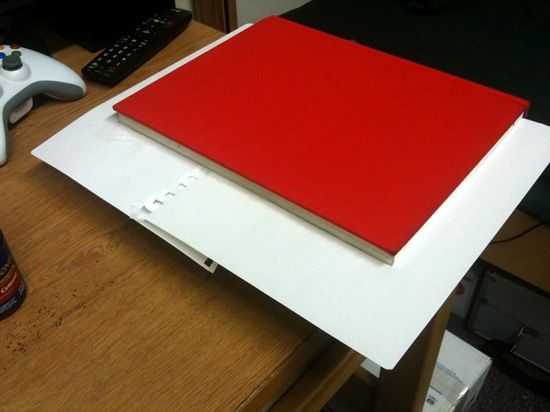
    Once you’ve cut deep enough to fully fit the iPad, you are going to use your tape to hold the pages in their closed-book positions. The first thing you want to do is to hold the cover of the book at a 90 degree angle (or prop it against something) while you use scotch take to make small wraps around the pages. In the picture above, I colored on the tape with sharpie so it could be easily seen. I picked up the whole of the pages and slid a piece of scotch under them to begin, then set them down and wrapped it around the outside to the top (do this for each piece of tape applied.) I folded the tape back on itself at the end to make a non-sticky tab that I could use to grip to remove the tape easily.
  5. IMG_4216 IMG_4219
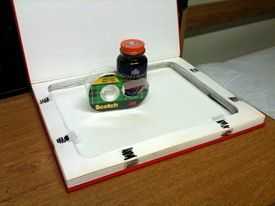
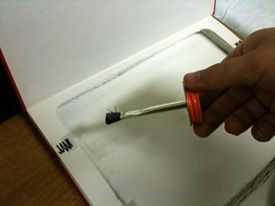
    When you are satisfied with the way the pages are being held, flip open the back cover and apply rubber cement to the back of the very last page (yes, over top of the tape). Once it is covered all the way around, close the back cover, flip the book over, and open the front cover. Begin applying rubber cement quite liberally around the inside surface of the page cuts. Close the cover and rest some weights on top of the book for at least an hour while it dries. When you return, remove the tape (it’s glued in the bottom cover, you can cut it, or it’ll rip pretty easily.)
  6. IMG_4231
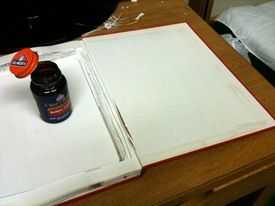
    Once the back cover and inside has been glued, flip the book face-down and slide a piece of paper or two between the block of pages and the front cover of the book to protect the cover and create a shelf for the rubber cement to rest on while you glue around the outside of the page block. Don’t worry about getting glue against the back cover as its already glued down to the pages!
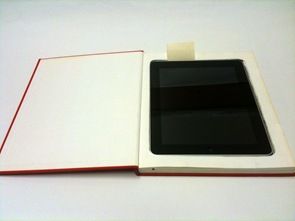
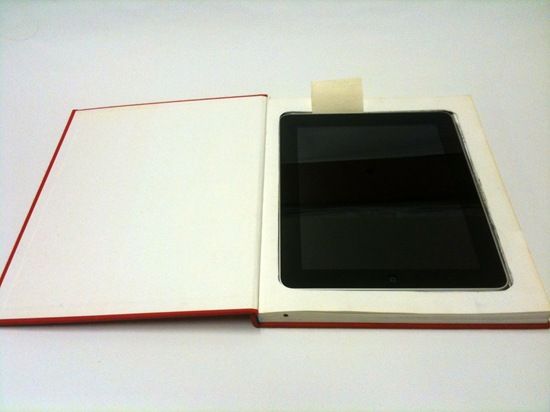
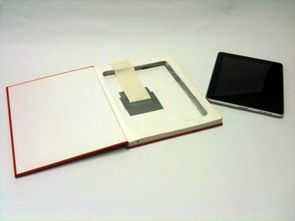
  7. Once you’ve got it all glued up you should rest some weight (other books work well) on top of it to keep everything firmly pressed down as the adhesive dries. After a few hours of drying you can remove the weights and open up the front cover to allow the inside adhesive to air out and dry. Depending on how tightly your fit turned out, you may choose to add the bookmark/tab piece to assist in removing it from the case.
  8. IMG_4223 IMG_4225
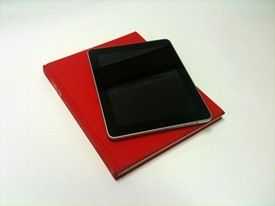
    Enjoy your iBook case.

Turning the iPad into an iBook (DIY iPad Booksafe case)


IMG_4225

Update: How-to guide is posted if you are interested.

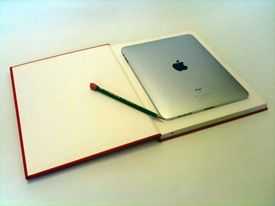
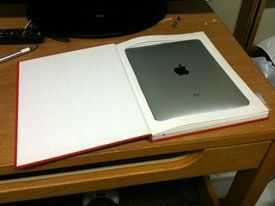
I was in the mood for a nice DIY project, so I picked up about $10 worth of materials (including the book) and decided to create myself an iPad case with a twist.

There were a few reasons I decided to make this:

  • Didn’t want to drop $40 for Apple’s iPad case
  • iPad back scratches easily, I hate to rest it naked on the table
  • I feel like a pretentious bastard using the iPad in public because everyone knows what it is, but few people have one — this helps me disguise it while in use
  • On a similar note, the iPad feels particularly vulnerable as a hot gadget, I feel much better leaving it sitting around while camouflaged than by itself

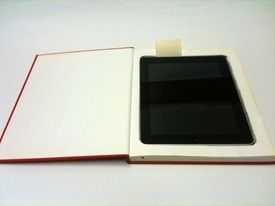
Have a look at the case, and if you’d like to make your own, I’ve documented the process and will put some instructions up a bit later. I’m sure there are more efficient approaches, but my way didn’t require any sort of workshop or power tools. The thing that looks like a bookmark from the outside is a strip of canvas secured with duct tape to help lift the iPad up when you want to get it out of the case (the fit is quite snug).

IMG_4227

I’m pretty happy with the results. The great irony here is that I don’t read a lot of books! For anyone interested, the book I used was Stand-Up Comedians on Television. Sorry for cutting up your book Larry Gelbart!

Some improvements that I might make at a later time:

  • Access to headphone/volume buttons/hold button while the iPad is in the case
  • Moleskine style elastic band to keep the book held closed

I went to a local book thrift store and looked for books with removable covers that looked relatively boring underneath, as to not attract attention. I also kind of dig that old-school material that they used to cover books in, so I looked for that as well. I took the iPad with me to size up some books and I look particularly for one that would offer enough padding around the iPad for be strong and durable, but not too much that it greatly increased the size of the iPad. As long as the book fits inside my backpack then it’s fine, as that’s where I carry the iPad when it comes with me anyway. I came out of the book store with three books of varying sizes so I could make sure that I got one that fit just right. I used one that I determined to be too thin to be my test book, so I did this whole process on that book first so I could fix any oversights or errors in the process for the final version that is shown here.

Limited edition pink UMID M1


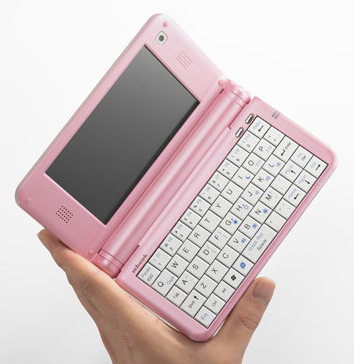
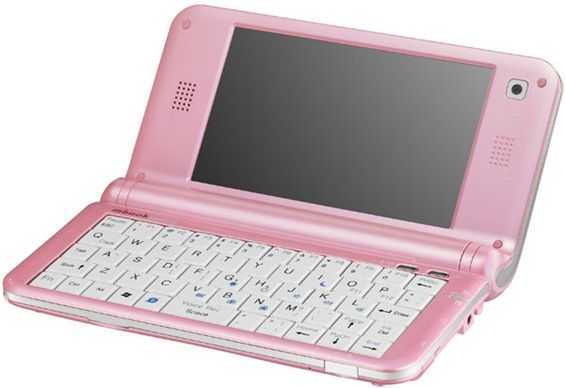
pink umid 2 The Viliv boys pointed out that Dynamism will be selling a limited edition* pink UMID M1 [Portal page]. Though the UIMD M2 is due out sometime soon — I guess the more colors, the better!pink umidThe pink UMID M1 is $50 less ($449) than the black low-end UMID M1 that Dynamism sells. Unfortunately no, they aren’t giving you $50 off just because its pink… the pink one has a slightly slower CPU the Atom Z515 at 1.2GHz (vs. 1.3GHz for the low-end black model, or 1.33GHz on the high-end black model). Everything else, however, is the same as on the low-end black model: 8GB SSD, 512MB of RAM, and Windows XP. From the images it is a bit tough to tell exactly how glossy or matte the pink version is, but it appears to be more on the matte side of the spectrum, similar to the black one that I looked at.

*Dynamism has the pink M1 down as “limited edition inch, but it isn’t exactly clear whether it is the pink M1 itself which is limited, or the deal currently running that includes a free pink pouch and 4GB MicroSD card.

Follow Chippy on  TwitterFollow Chippy on  YouTube

The most popular UMPCs on UMPCPortal

Acer Aspire Switch 10
10.1" Intel Atom Z3745
Acer C740
11.6" Intel Celeron 3205U
VIA Nanobook
7.0" VIA C7-M
Lenovo Ideapad Flex 10
10.1" Intel Celeron N2806
Acer Aspire E11 ES1
11.6" Intel Celeron N2840
Dell Chromebook 11
11.6" Intel Celeron 2955U
Dell Latitude E7440
14.0" Intel Core i5-4200U
Acer TravelMate B113
11.6" Intel Core i3
HP Elitebook 820 G2
12.5" Intel Core i5 5300U
Acer Chromebook 11 CB3-131
11.6" Intel Celeron N2807

Find ultra mobile PCs, Ultrabooks, Netbooks and handhelds PCs quickly using the following links: